Monday 19 August 2013

Configuring Information Rights Management in SharePoint 2013

In this article, we will go through the steps of configuring Information Rights Management in SharePoint 2013.

I'm using Active Directory Rights Management Service which is in a cluster for the SharePoint 2013 server.

 
Overview of the demo environment I am using.
  • Contoso DC: DNS, Active Directory Domain Controller
  • Contoso IRM: Active Directory Rights Management Service A
  • Contoso CA: Active Directory Rights Management Service B
  • SQL01: Primary Replica SQL Server 2012
  • SQL02: Secondary Replica SQL Server 2012
  • SQLAAG01: Always on Availability Group 01
  • FIM01: SharePoint 2013 Server

To install and Configure Rights Management Service and create a cluster, refer to this article which has got the detailed information on how to do do.

To configure Information Rights Management, navigate to Central Administration > Security
Information Policy > Configure Information Rights Management


This will display three options

  • Don not use IRM on this server which is the default value
  • Use the default RMS server specified in Active Directory ( The information of this is present in AD Sites and Services)
  • Use this RMS Server ( you can specify the IRM website URL which can be load balanced using Network Load Balancer or Hardware Load Balancer)


Select use the default RMS Server specified in Active Directory or RMS Server URL

Click Ok


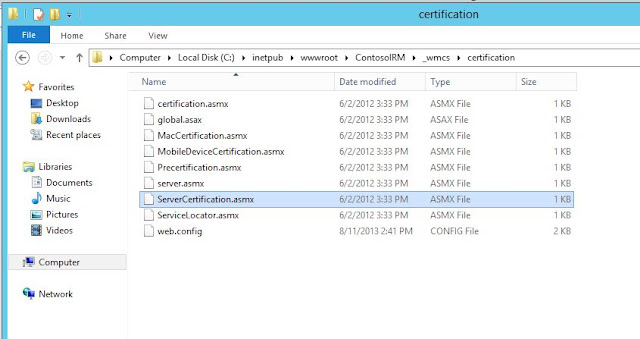
Regardless of whether you select 2nd or 3rd option, you will have to make sure you have given appropriate rights to ServerCertification.asmx or it won't be able to detect or accept the URL.

This can be found under the  Inetpub > wwwrot > WebsiteName > _wmcs > Certification

If your IRM is in a cluster you will have to perform the permission steps for both the files in the IIS websites which are part of your cluster.

For the demo purpose I have granted read and execute permissions to the Farm account and Everyone.


The information rights management can be applied at Library or List level. There is no option to set this up at Web Applicaiton or Site Collection or Site Level.

Though you can use Powershell command to enable IRM at Web App or Site Collection or Site Level for all Libraries or Lists but this has to be planned for what site requires IRM policies


To Enable Information Rights Management , navigate to respective document library and go to the document library settings

Under Permissions and Management, Click on Information Rights Management


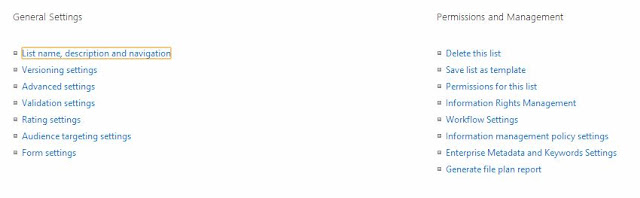
This will present bunch of options based on what you need and you can perform the following

  • Create a Permission Policy and Apply it
  • Can restrict users from uploading documents
  • Can Restriction Access Polixy Expiry Date
  • Prevent Users from opening the document in the browser
  • Restrict viewers from printing
  • Restrict users from writing to a downloaded copy of the document
  • Set Access rights expiry date for a downloaded document
  • Set restriction on validating login credentials after a certian period for a downloaded document

All this needs to be planned on what you want to achieve based on your requirement to meet the compliance policy you may have in your organization. The policy definition may be a corporate policy for confidential documents defined by Information Security Officer or your business or client needs.

This is a good way of protecting the information but IRM doesn't provide any encryption or decryption of the document based on encoded keys.

Sunday 11 August 2013

Installing and Configuring Active Directory Rights Management Service in a Cluster on Windows Server 2012

In this article, I will cover the installation and configuration of Active Directory Information Rights Management Service as a cluster on Windows Server 2012 with databases on SQL Server Always on Group on SQL Server 2012.

This is a prep work for configuring the Information Rights Management for SharePoint 2013 which I will cover later.

Overview of the demo environment I am using.

  • Contoso DC: DNS, Active Directory Domain Controller
  • Contoso IRM: Active Directory Rights Management Service A
  • Contoso CA: Active Directory Rights Management Service B
  • SQL01: Primary Replica SQL Server 2012
  • SQL02: Secondary Replica SQL Server 2012
  • SQLAAG01: Always on Availability Group 01
  • FIM01: SharePoint 2013 Server


Installation and Configuration of AD RMS on the First Server and configuring the Cluster:

I will start with the 
  • Installation of Active Directory Rights Management Service on the first server i.e ContosoIRM
  • Configuriation of the Additional Steps and creating the cluster

Launch the Server Manager , Click on Add Roles and Features


Click on Next


Click on Next 

Select the Server, Click Next 


Select Active Directory Rights Management Services, Click Next


 Click Next 


Click Next 


Select AD RMS  , Click Next 


Click Install to Start the Installation Process.


Installation may consume around 15 minutes or less


Installation Complete, Click on Close


In the Server Manager, Click on the Falg to Perform the Additional Configuration 


Click on Next

Select Create a new AD RMS root cluster, Click Next


In this scenerio , I am using Always on Availability Group, Click on Specify a Database Server and a Database Instance

I have specified the AAG name  and Selectthe Database Instance

Click Next


Specify the Service Account that has access to the Database Server


 I have gone with the Cryptographic Mode 2 option, click Next


Its good to have a centrally managed key storage but depending upon the required select what you need 


Specify the Cluster Key Password, this will be used while joining the AD RMS Server B in the cluster


Select the Web Site , I have already named the website as ContosoIRM

You can pre-configure the website with DNS Host entry


I will go with http instead of https though the screenshot is for https 


Name the server Licensor Certificate 

This is an important step to register the SCP , I will register it via the configuration wizard. If you have already attempted to install AD RMS on the same server, you will have to delete the RMS from AD Sites and Services to install it again


Click Install to Configure it. Note if you use https the databases will have 443 in the suffix of the database names. 

Click Install to proceed


This may consume again upto 15 minutes


Installation Complete


Now log off and log in back

Launch the Active Directory Rights Management Services  from the metro menu


Here we go the Cluster is configured


Following 3 databases have been created in Always On Group primary replica, I will add the the databases in AAG group later. As I am using http all databases have 80 in the suffix.


2) Installation and Configuration of AD RMS on Server B i.e. ContosoCA

Launch the Server Manager
Install the Active Directory Rights Management Services as covered above.
Once installed, Click on the Flag in Server Manager to perform Additional Configuration Steps , I will cover the steps from here.

Click on Perform Additional Configuration


This launches the Configuration Wizard for AD RMS, Click Next


Select Join an existing AD RMS Cluster, Click Next


Specify the Database Server Name , in my case Iwill provide the Always on Availabilty Group name click on Select 
Select Default Instance from the List

It should pick up the Configuration Database name, if not click on the drop down to select the Config database name

Click Next


Specify the same Cluster Key which was used while creating the Cluster i.e. centrally managed key

Click Next

Specify the database service account by clicking on Specify 


Now that I have specified the Service Account details , Click Next


Select the website, you can pre-configuring by creating a blank website with fqdn and bindings. This is important if you want to load balance the AD RMS website.

You can do this by using Microsoft NLB for POC purpose but in real world you would want to use Hardware Load Balancer like F5 or Barracuda to achieve load balancer I won't get into the details of this here as there are good articles which cover the same somewhere else.

In this scenario I'm selecting the default website I created, Click Next.


Click on Install to start the Installation and Configuration


The installation is complete now


Log off and Log in Back, Launch AD RMS


The installation and  configuration of the AD RMS is completed and we created the cluster as well all on Windows 2012 and databases highly available on SQL Server 2012 Always on Group.

There is more to AD RMS i.e. Trust Policies , User Execution, Security policies, policy templates etc. This article is just to illustrate the installation of AD RMS and configuration of the cluster for demo purpose. For more information please refer to the relevant tech net article.

I will configure AD RMS for SharePoint 2013 ad will cover this in some other article.


Monday 8 July 2013

SharePoint 2013 SQL Server Always On

We will go through the process of using always on Availability group with a Content Farm 1 which is on SharePoint 2013, all components on Windows 2012

Environments
Server
Role
Operating System
SQL01
Primary Replica SQL Server 2012
Windows 2012 Standard
SQL02
Secondary Replica SQLServer 2012
Windows 2012 Standard
ContentFarmB
SharePoint 2013 Enterprise Edition
Windows 2012 Standard
ContosoDC
AD Domain Controller
Windows 2012 Standard
SQLAAG01
Always on Availability Group 1


I have used a script to install SharePoint 2013 and have mentioned a SQL Alias called ContentFarm1 pointing to Always on Availability Group 1 named SQLAAG01

If installing using the vanilla interface you can create a SQL Alias and point it to Always on Availability Group 1 or you can also use Always on Availability Group name

I have already configured Always on Availability group named SQLAAG01 consisting of two replica’s primary SQL01 and secondary SQL02

After you have installed SharePoint server and run the configuration wizard, all databases i.e. the configuration, admin and content databases are created on Primary replica.

You will have to manually add the databases into Always on Availability Group. Here are the steps to follow

The scripted install created two databases i.e. 


  • ContentFarm1_Config
  • ContentFarm1_Admin

We don't have it yet in the Always on Group.


First take a backup of the two databases as its a prerequisite to have the backup in the tail log


 Expand the AAG Group, Right Click on Availability Database, Click on Add Database


Click on Next 


Select the Database , Click Next


Specify  Data Synchronization location, I have already configured a shared network location called Backup 


Connect to the Secondary Replica , click on Connect


This does an availability group validation , Click Next


Click Next


Now I have got the databases synchronized 


Expand the Availability Database to check if the Databases have been added 


There we have it. Ideally I would script this when doing it in Production environment. This is just for the capturing this in the demo.