In this article, we will go through the steps of configuring Information Rights Management in SharePoint 2013.
This will display three options
Select use the default RMS Server specified in Active Directory or RMS Server URL
Click Ok
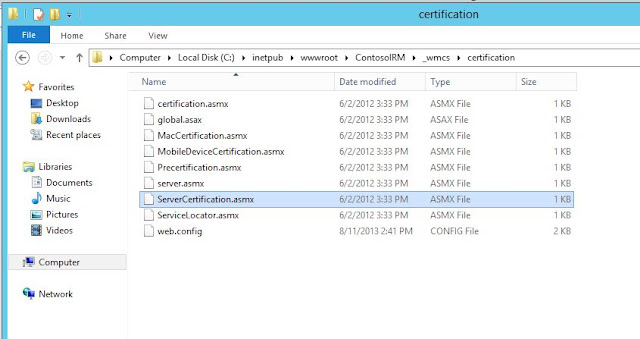
Regardless of whether you select 2nd or 3rd option, you will have to make sure you have given appropriate rights to ServerCertification.asmx or it won't be able to detect or accept the URL.
This can be found under the Inetpub > wwwrot > WebsiteName > _wmcs > Certification
If your IRM is in a cluster you will have to perform the permission steps for both the files in the IIS websites which are part of your cluster.
For the demo purpose I have granted read and execute permissions to the Farm account and Everyone.

The information rights management can be applied at Library or List level. There is no option to set this up at Web Applicaiton or Site Collection or Site Level.
Though you can use Powershell command to enable IRM at Web App or Site Collection or Site Level for all Libraries or Lists but this has to be planned for what site requires IRM policies
Under Permissions and Management, Click on Information Rights Management

This will present bunch of options based on what you need and you can perform the following
All this needs to be planned on what you want to achieve based on your requirement to meet the compliance policy you may have in your organization. The policy definition may be a corporate policy for confidential documents defined by Information Security Officer or your business or client needs.
This is a good way of protecting the information but IRM doesn't provide any encryption or decryption of the document based on encoded keys.
I'm using Active Directory Rights Management Service which is in a cluster for the SharePoint 2013 server.
Overview of the demo environment I am using.
- Contoso DC: DNS, Active Directory Domain Controller
- Contoso IRM: Active Directory Rights Management Service A
- Contoso CA: Active Directory Rights Management Service B
- SQL01: Primary Replica SQL Server 2012
- SQL02: Secondary Replica SQL Server 2012
- SQLAAG01: Always on Availability Group 01
- FIM01: SharePoint 2013 Server
To install and Configure Rights Management Service and create a cluster, refer to this article which has got the detailed information on how to do do.
To configure Information Rights Management, navigate to Central Administration > Security
Information Policy > Configure Information Rights Management
Information Policy > Configure Information Rights Management
This will display three options
- Don not use IRM on this server which is the default value
- Use the default RMS server specified in Active Directory ( The information of this is present in AD Sites and Services)
- Use this RMS Server ( you can specify the IRM website URL which can be load balanced using Network Load Balancer or Hardware Load Balancer)
Select use the default RMS Server specified in Active Directory or RMS Server URL
Click Ok
Regardless of whether you select 2nd or 3rd option, you will have to make sure you have given appropriate rights to ServerCertification.asmx or it won't be able to detect or accept the URL.
This can be found under the Inetpub > wwwrot > WebsiteName > _wmcs > Certification
If your IRM is in a cluster you will have to perform the permission steps for both the files in the IIS websites which are part of your cluster.
For the demo purpose I have granted read and execute permissions to the Farm account and Everyone.

The information rights management can be applied at Library or List level. There is no option to set this up at Web Applicaiton or Site Collection or Site Level.
Though you can use Powershell command to enable IRM at Web App or Site Collection or Site Level for all Libraries or Lists but this has to be planned for what site requires IRM policies
To Enable Information Rights Management , navigate to respective document library and go to the document library settings
Under Permissions and Management, Click on Information Rights Management

This will present bunch of options based on what you need and you can perform the following
- Create a Permission Policy and Apply it
- Can restrict users from uploading documents
- Can Restriction Access Polixy Expiry Date
- Prevent Users from opening the document in the browser
- Restrict viewers from printing
- Restrict users from writing to a downloaded copy of the document
- Set Access rights expiry date for a downloaded document
- Set restriction on validating login credentials after a certian period for a downloaded document
All this needs to be planned on what you want to achieve based on your requirement to meet the compliance policy you may have in your organization. The policy definition may be a corporate policy for confidential documents defined by Information Security Officer or your business or client needs.
This is a good way of protecting the information but IRM doesn't provide any encryption or decryption of the document based on encoded keys.


